Hit testing in SceneKit

To find a 3D node pointed to by the user in SceneKit, add a tap gesture recogniser in ViewDidLoad()


  let fingerTap = UITapGestureRecognizer(target: self, action: "handleTap:")
  self.view.addGestureRecognizer(fingerTap)


And here’s a simple handler:


func handleTap(sender: UIGestureRecognizer)
{
    let p = sender.locationInView(self.sceneView)

    let hitResults = self.sceneView.hitTest(p, options: nil)

    if let results = hitResults {
        if (results.count > 0) {
            let result: SCNHitTestResult = results[0] as! SCNHitTestResult
             println("Hit \(result)")
        }

     }
}


Using SceneKit with animated Collada file

I recently needed to load a Collada file into SceneKit and have a short animation play once as soon as the file was loaded.

The Collada file with animation had to be exported from Maya and the initial loading and playing was very straightforward.


func sceneSetup() {
    let scene = SCNScene(named: "Scenes.scnassets/test.dae")
    sceneView.scene = scene
    sceneView.autoenablesDefaultLighting = true
}

However, the animation looped continually.

I not sure this is the best fix but iterating through all possible node animations and setting the repeatCount to 1 fixed the problem.


func sceneSetup() {
    let scene = SCNScene(named: "Scenes.scnassets/test.dae")

    //Get all the child nodes
    let children = scene?.rootNode.childNodes
    
    //Initialise the count of child nodes to zero
    var childCount = 0

    //Iterate through the child nodes
    if let theChildren = children {
        for child in theChildren {
            let keys = child.animationKeys() //get all the animation keys

            //Iterate through the keys and get each animation
            if let theKeys = keys {
                for key in theKeys {
                    let animation = child.animationForKey(key as! String)
                    //Set the repeatCount to 1
                    animation.repeatCount = 1

                    //Write the new animation back
                    scene?.rootNode.childNodes[childCount].removeAnimationForKey(key as! String)
                    scene?.rootNode.childNodes[childCount].addAnimation(animation, forKey: key as! String)
                }
            }
            //Increment the childCount
            childCount++
         }
     }
     sceneView.scene = scene
     sceneView.autoenablesDefaultLighting = true
}

Making a Singleton in Swift

A Singleton is a design pattern that only allows the instantiation of a single instance of a class.

Here’s a simple way of setting up a Singleton in Swift.


let sharedThing = MySingleton()

class MySingleton {
    var name = "Eric"
}

This can be accessed anywhere in your code.

sharedThing.name has default initialisation value “Eric” and can be set with a line such as;


    sharedThing.name = "Lynda"

A lot less typing than was needed to do the same thing in Objective C !

UISlider Thumb Tint not working

Seems to be a problem when trying to set a UISlder’s thumb tint in the Attribute Inspector as well as in code. The colour of the thumb stays white whatever colour it is set to. A work-around appears to be to assign an image first. Simple enough to assign it’s existing image and then the tint works when set programmatically.


UISlider.appearance().setThumbImage(self.alphaSlider.currentThumbImage, forState: .Normal)

self.alphaSlider.thumbTintColor = UIColor(red: 1.0, green: 0.0, blue: 0.0, alpha: 1.0)

Strange!

Replacing MKMapView annotation with a popover

When working recently with a MKMapView I wanted to replace the usual annotation view with a popover. First try at this resulted in the popover displaying correctly but together with the annotation view.

I then tried turning off the annotation view using

view.canShowCallout = false

inside the function

func mapView(mapView: MKMapView!, viewForAnnotation annotation: MKAnnotation!) -> MKAnnotationView!

Although at first this seemed to give the desired result, the pin could not be selected a second time. The solution was to first ensure that the annotation had been deselected before presenting the popover.

func mapView(mapView: MKMapView!,didSelectAnnotationView view: MKAnnotationView!){

// deselect the annotation first self.mapView.deselectAnnotation(view.annotation, animated:true)

var popOverContent = UIStoryboard(name:"Main", bundle:nil).instantiateViewControllerWithIdentifier("MapPopOverVC") as UIViewController popOverContent.modalPresentationStyle = UIModalPresentationStyle.Popover popOverContent.popoverPresentationController?.sourceView = view popOverContent.popoverPresentationController?.sourceRect = view.bounds var detailPopover: UIPopoverPresentationController = popOverContent.popoverPresentationController! detailPopover.permittedArrowDirections = UIPopoverArrowDirection.Any presentViewController(popOverContent, animated:true, completion:nil) }

Swapping ViewControllers on device rotation

I recently needed to have one ViewController for portrait orientation and a different ViewController for landscape. To achieve this using iOS 8 and Swift, create the two ViewControllers in your StoryBoard along with their classes. Ctrl-drag form one to the other and vice-versa, creating modal segues between them. Name the Identifiers; in my case these were fromMap and fromNews. Then, in each of the ViewController classes, override willRotateToInterfaceOrientation(…).

 
override func willRotateToInterfaceOrientation(toInterfaceOrientation: UIInterfaceOrientation, duration: NSTimeInterval)
{
        if (UIInterfaceOrientationIsLandscape(toInterfaceOrientation))
        {
                self.performSegueWithIdentifier("fromNews", sender: self)
        }
}
 
override func willRotateToInterfaceOrientation(toInterfaceOrientation: UIInterfaceOrientation, duration: NSTimeInterval)
{
        if (UIInterfaceOrientationIsPortrait(toInterfaceOrientation))
        {
                self.performSegueWithIdentifier("fromMap", sender: self)
        }
}

Creating tiled overlays with MKTileOverlay and Swift

Here’s how to create a tiled map overlay using iOS MKTileOverlay and MKTileOverlayRenderer.

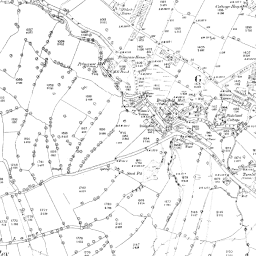
First, you need a set of tiled map images to overlay.  MapTiler (maptiler.com) is great for producing these from your own images. Specify the image bounds in terms of latitude and longitude; North, South, East, West to locate it in the world. The map tiles are then exported in folders named for zoom level and x and y tile coordinates.  For example, my folder, covering the town of Glossop in the UK, is called Map1880 and contains subfolders 12, 13, 14, 15, 16 each containing image tile sets for these zoom levels. For my particular overlay, inside folder 15 I have seven subfolders each representing the tile row (i.e. x coordinates); 16202 to 16208. Inside each of these are the PNG image files, named with tile column numbers (i.e. y coordinates); e.g. 22160.png and 22161.png shown here.

22160       22161

Add the top folder to your XCode project, making sure “Copy items if needed” is ticked and “Create folder references” selected. The folder should appear in blue in the Project Navigator.

In your ViewController, make sure you have a MapView, import MapKit and make subclass of MKMapViewDelegate.


import MapKit

class DetailViewController: UIViewController, MKMapViewDelegate {
    @IBOutlet var mapView: MKMapView!

    .....
}

In viewDidLoad() set the delegate and configure the overlay. Confusingly there seems to be two ways of specifying the tile y coordinates; either counting from the North or counting from the South. Using an older version of MapTiler I found that the y coordinates were not generated the same way round as Apple Maps so had to flip the y coordinates.

Also note that I am using a subclass of MKTileOverlay here simply so I can apply different alpha values to subsequent overlays.

override func viewDidLoad() {
    super.viewDidLoad()
    self.mapView.delegate=self;
    self.configureView()
}

func configureView() {
    self.mapView.mapType = MKMapType.Satellite
    self.recentreMap();

    //Get the URL template to the map tiles
    let baseURL = NSBundle.mainBundle().bundleURL.absoluteString
    let urlTemplate = baseURL?.stringByAppendingString("/Map1880/
                                              {z}/{x}/{y}.png/")

    var overlay = MyTileOverlay(URLTemplate:urlTemplate)

    //Need to flip maps generated with MapTiler
    overlay.geometryFlipped = true

    //Don't want to replace underlying Apple map
    overlay.canReplaceMapContent = false
    
    //Set the overlay transparency
    overlay.alpha = 0.7

    //Add the overlay
    self.mapView.addOverlay(overlay)

}

func recentreMap() {

    //Map centre on Glossop UK
    let centre = CLLocationCoordinate2D(latitude: 53.4435,
                                              longitude: -1.95)

     //Declare span of map
    let span = MKCoordinateSpan(latitudeDelta: 0.03, 
                                      longitudeDelta: 0.03)

    //Set region of the map
    let region = MKCoordinateRegion(center: centre, span: span)
    self.mapView.setRegion(region, animated: false)
    self.mapView.regionThatFits(region)
}

mapView is called on delegate when tiles need displaying

func mapView(mapView: MKMapView!, rendererForOverlay overlay: 
                            MKOverlay!) -> MKOverlayRenderer! {

    if overlay is MKTileOverlay {
        var renderer = MKTileOverlayRenderer(overlay:overlay)
        //Set the renderer alpha to be overlay alpha
        renderer.alpha = (overlay as MyTileOverlay).alpha

        return renderer
    }
    return nil
}

As stated above, I am using a subclass of MKTileOverlay simply so I can set overlays with different alpha values.

import Foundation
import MapKit

//This subclass was created to set alpha and for debug purposes
//Can set break point and check tile zoo, x, and y being accessed

class MyTileOverlay : MKTileOverlay {
    var alpha: CGFloat = 1.0

    override func loadTileAtPath(path: MKTileOverlayPath, 
                  result: ((NSData!, NSError!) -> Void)!) {

         super.loadTileAtPath(path, result)

         //Set breakpoint or write out path for debug
         NSLog("Inside load") 
    }
}

The override of loadTileAtPath() is included as I set a breakpoint at NSLog() to view the path string. I did this when trying to discover why my map overlay wasn’t displaying and found the y coordinate flip problem identified above.

Update:

The above code works but does appear to have a problem in that the renderer tries to load overlay tiles for the whole region in view even when the tile image files do not exist because they are outside the overlay map area. This results in logging of a stream of error messages. This needs looking into when I have time. In the meantime if anyone knows a good way of solving this then please let me know.